

Premiere Pro Project / Sequence setup.
- Nidhin Prem
- Jun 16, 2020
- 3 min read
Updated: May 17, 2021
I'm really happy to share with you the steps that I always use to setup my premiere pro project/sequence. This is my personal method that I find effective irrespective of the system specifications.
FYI - This method is applicable only on the cc versions of premiere pro and this blog post is especially based on Premiere pro 2021 (15.1)

Step 1
File - New - project (or Ctrl+Alt+N) as you can see below.
Premiere also allows you to totally customize your shortcut keys which I'll also be covering in an upcoming blog.

Step 2
Enter your project name and the location you want to save the project in the name and the location dialogue box respectively. *Make sure that you create a new folder preferably on an SSD for your project files so that it will make your life easier in managing your projects.
Under the general tab, video rendering and playback are exactly what it sounds like and it’s the most important setting that allows you to render and preview your projects. This is one among the many other things that you have to check if you come across any render or playback issues. Renderer depends on the graphics card that your system is equipped with.
- CUDA for Nvidia
- OPENCL for AMD RADEON, and
software only if your system doesn't have graphics and is running on integrated graphics which is not an ideal configuration that you want to run premiere on.
NVIDIA CUDA :

AMD RADEON :

All the other settings can be at their default.
Display the project item name and label color for all instances lets you set color codes for footages, making it easier to organize footages in the timeline.

Scratch disk.
This is where all your project renders and cache gets saved. And, it plays a huge role in deciding the speed of your render, playback and, project saving time.
As I said earlier, always have your project file on an SSD as its x4 times faster than normal HDDs. And also set the scratch disk as same as the project. Or, you can also change it to any location that you prefer.
We will see about ingest settings while we are going through Proxy workflow

Hit enter to create your project.
You can always change these settings after creating the project by going into FILE - PROJECT SETTINGS - GENERAL

Creating and setting up a sequence.
File - New - Sequence (or Ctrl+N) as you can see below.

As most of the people out there, I’d suggest DSLR filmmakers just go ahead and choose a preset for their sequence depending on the frame rate at which they shot or the frame rate at which they need their timeline to be.
Mixing up the sequence frame rate and footage frame rate might get you some render and playback issues. So always shoot at the frame rate at which you want your final video at.
Frame rate should always match the framerate of footage which is mostly 24fps or 25fps.
The above-mentioned guideline is not applicable for slow motion and high frame rate videos which you will be slowing down to 24fp later.

Settings
So when you go into the setting tab, it will look something like this at default.
And again I’m just going to show you how to set it up in the most ideal settings.
Under video, the frame size depends on your personal preference.
4k, 2k, FHD, etc...
And this also depends on the format and resolution at which you shot the footage at. You can’t just simply shoot your video at 1080p and create the sequence at 2160p aka 4k and expect it to get magically converted to 4k. What you shoot is what you get.
Here is a website that I always use to enter my own custom resolution.
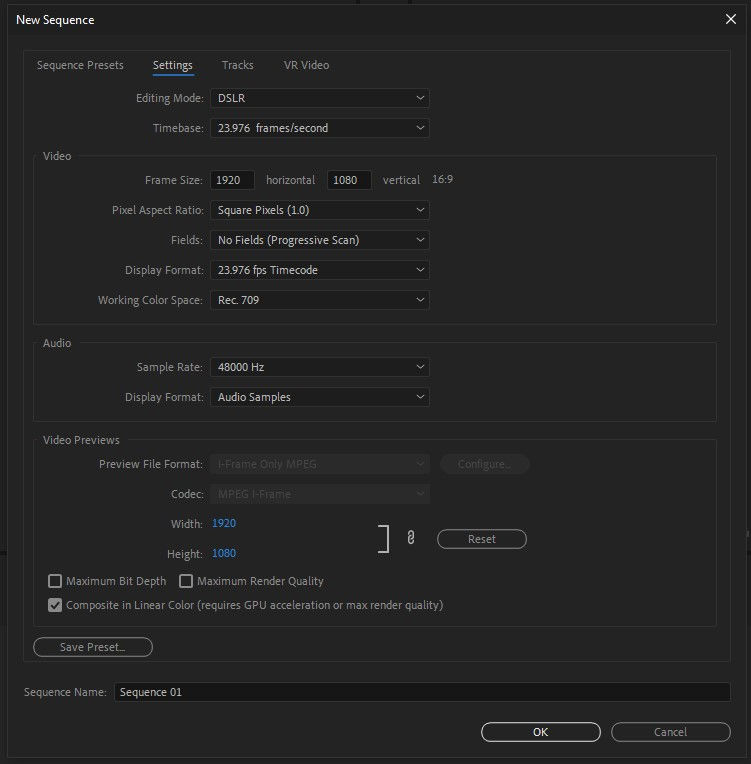
SO MAKE YOUR SEQUENCE SETTING AS THE SAME AS IN THE IMAGE BELOW
Sequence name is your own preference and please do make sure that you name it properly so that it would be easy for you to find and organize the sequence.
*Video previews again is another important thing that you should always change because the default one sucks.
Change it to Quicktime codec apple proress 422proxy as it’s an easier file compression that doesn't put much pressure on your processor and easy to be played back.
And at times, it could increase your time taken to render.
And for the preview resolution, please make sure that it’s somewhere lower than your sequence setting if you are working on a slower pc.
And importantly, you can only select the preview file format only after changing the editing mode to custom.
- You can also save this as a custom preset for future use.

I hope this was helpful. If you have any queries you can reach me at nidhinpremspostbox@gmail.com.
And please let me know if you want this as a small video tutorial.
Thank you!
Edited By Ashwin Surya https://www.instagram.com/rolling_action_cut/
Comments